 FLINTS
FLINTS Overview
FLINTS is a semi-automated, near-complete feature location tool. It is based on the insight that higher recall is facilitated by a semi-automated approach, that experienced developers in our collaborating company can find a foothold into a feature’s location fairly quickly but find it difficult to find all the code associated with the feature, and that they typically follow static code dependencies to do so (calls, field accesses). It also allows the user keep track of the code they have studied, an important consideration in a task that may take hours or even days and by interrupted by colleagues, meals, and home-time. The tool also uses a variant of Robbiliard’s algorithm to suggest candidate code to the user, that is more likely to be associated with the feature. Video Demo 1 shows a demo of the usage of the Structural Feature Location technique using Robbiliard’s algorithm in FLINTs.
An updated version of FLINTs incorporated the other code dependencies and other Feature Location techniques, Textual Feature Location (rVSM), along with a query enhancer (query recommender) technique to aid the Textual Feature Location technique. Video Demo 2 shows a demo of the usage of Textual Feature Location technique with a Query Enhancer aid.
Video Demo 1 & Download Information
Video Demo 2: Textual Feature Location and Query Enhancer)
Set Up and Running of the Tool
The UI for the FLINTS tool comprises of 6 panels (3 top, 3 bottom), each of which control a different element of the tools functionality as seen here.
Top Bottom
Top-Left - Incomming Dependancies Bottom-Left - Package Explorer
Top-Center - Featre IO Bottom-Center - Model
Top-Right - Outgoing Dependancies Bottom-Right - Relations
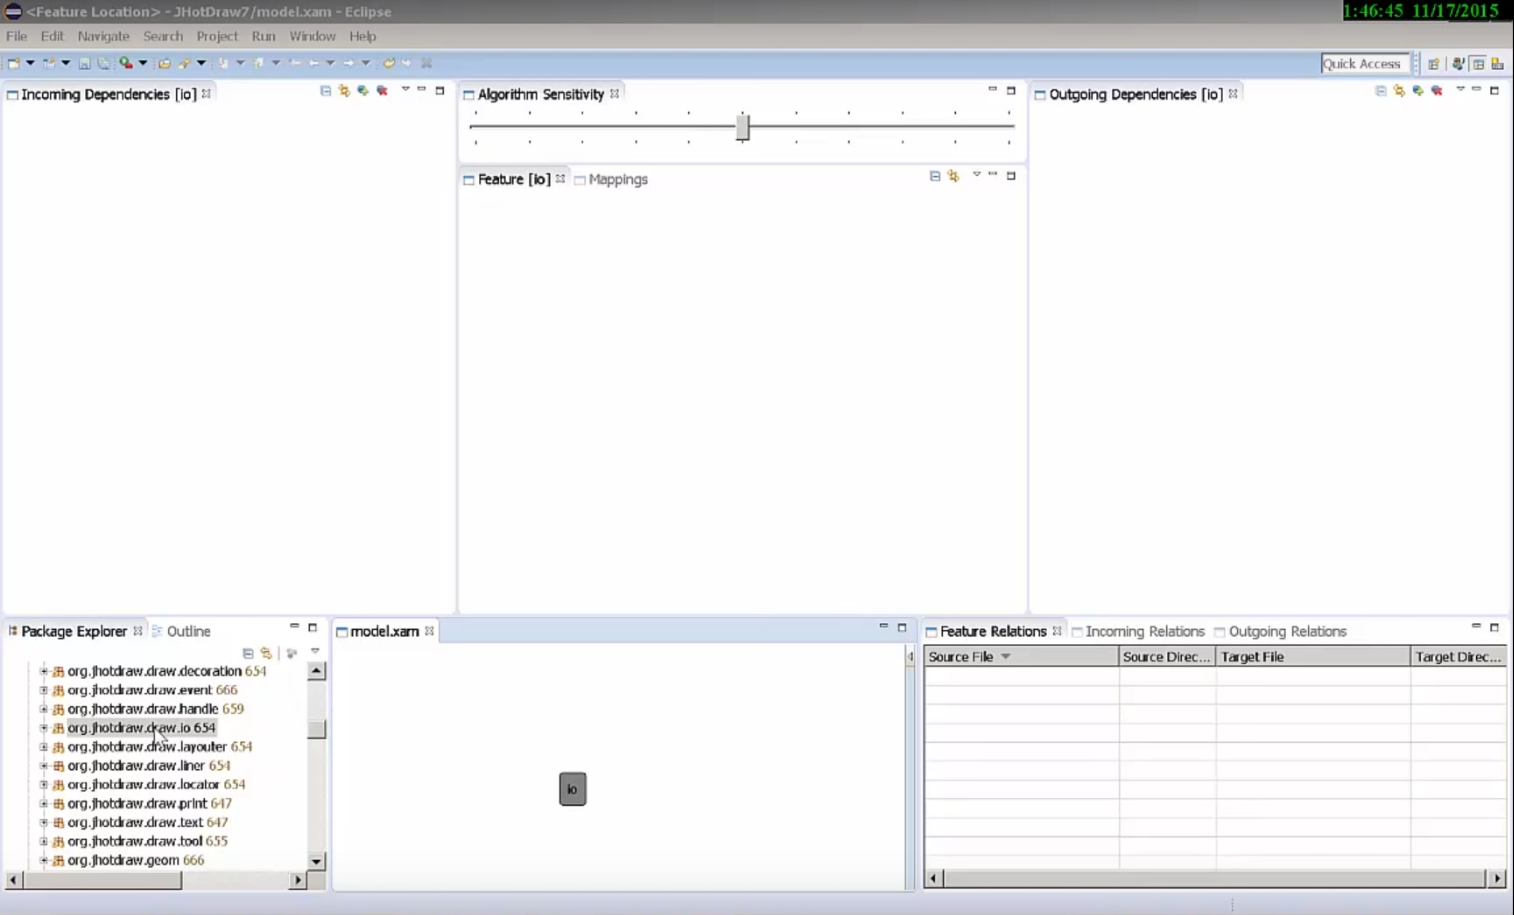
Select the IO feature/package that you are interested in from the Package Explorer. Drag and drop the package you wish to explore into the ‘Model’ panel. You will notice that the 3 panels at the top change immediately. They now contain information relating to the package you choose. Expand the folder inside of the ‘Feature IO’ panel. This will allow you to view the content inside of the package. The next step is to look at the relationships both in and out of these files
If you expand the symbol within the ‘Incoming Dependencies’ panel you will be presented with a list of folders. Each of these files has an incoming dependency with the feature you have selected. It will also allow you to view the relationships both in and out of these files. The ‘Outgoing Dependencies’ panel contains similar information, only it lists dependencies that are outgoing. The panel located on the top-left of the screen contains the incoming dependencies for the selected package. It is important to not that the list of files shown is not a list of all of the files in the folder, it’s only the files that have a direct relationship to the feature we have selected. You’ll notice that some of the files and folders are bolded. The bolding is based on an algorithm which looks at the amount of outgoing or incoming calls, the sensitivity of which can be adjusted by the ‘Algorithm Sensitivity’ bar at the top. As you slide to the right you will see more and more of the dependencies become bolded and as you slide to the left, less and less of them become bolded.
You can also expand and make changes to your selected feature by adding additional files and folders to it. For e.g. if you select a file or folder from the 'Outgoing Dependencies' panel, right click on it and select 'Map to Active Feature'. It is important to note that only files which have a relationship to the feature will be transferred from the folder to the feature. All other files not related to the feature will remain in the folder and will not be transferred. If you now look in your 'Feature IO' panel you will see that the feature has changed and that the files you mapped to the feature are now part of the feature.
You can also expand and make changes to your selected feature by adding additional files and folders to it. For e.g. if you select a file or folder from the 'Outgoing Dependencies' panel, right click on it and select 'Map to Active Feature'. It is important to note that only files which have a relationship to the feature will be transferred from the folder to the feature. All other files not related to the feature will remain in the folder and will not be transferred. If you now look in your 'Feature IO' panel you will see that the feature has changed and that the files you mapped to the feature are now part of the feature.
In addition to adding to elements to feature you can all remove files that you do not want as part of a feature. To do this you simply select a file or folder from either the 'Incoming' or 'Outgoing Dependencies' panel, right click on it and select 'Mark as Processed'. A line will then be drawn through that file/folder. You can choose to not display all processed files and folders by de-selecting the 'Show Processed' icon, found on the top right of the panel.
Finally, to obtain a graphic representation of a relationship between a file/folder to a feature you can simply drag and drop that file or folder, from the 'Incoming' or 'Outgoing Dependencies' panels, and place it into the 'Models' panel. You now have a graphical representation of the number of relationships between your selected feature and the component you just dragged down.